
Tethering with Photo Supreme
Setting up your tethering configuration
Before delving into the details of tethering in Photo Supreme, it’s essential to first set up your tethering configuration.
To configure tethering, you need the following:
1. Required Hardware
Camera: Ensure your camera supports tethering. Check the manual or specifications for compatibility with tethering software. Popular brands like Canon, Nikon, Sony, and Fujifilm often support tethering on mid-to-high-end models.
Connection Cable: A USB cable (commonly USB-A to USB-C, USB-A to Micro USB, or USB-C to USB-C) that fits your camera and computer. Some setups may use an HDMI or proprietary cable for advanced tethering.
Computer or Device: A laptop or desktop with sufficient processing power and available USB ports. Alternatively, a tablet that supports the required tethering software.
Optional: Wireless Tethering Accessories: Wi-Fi-enabled cameras or external wireless transmitters for cable-free tethering.
2. Required Software
Camera Manufacturer’s Tethering Software: Install the software provided by your camera’s manufacturer (e.g., Canon EOS Utility, Nikon Camera Control Pro, Sony Imaging Edge). This software manages the connection and stores captured images in a local folder.
Photo Supreme: Install Photo Supreme v2025 or similar software to monitor the tethering folder and handle images after capture.
3. Camera Settings
Set your camera to PC mode or Tethering mode, as described in the user manual. Configure settings like image format (e.g., RAW or JPEG) and storage location (camera card, computer, or both).
4. Computer Settings
Install the necessary drivers for your camera if they are not automatically installed. Connect your camera to the computer and ensure it is recognized by the tethering software.
5. Tethering Folder Setup
Choose or create a dedicated tethering folder on your computer where the tethering software will save captured images. In Photo Supreme, configure its tethering feature to monitor this folder for new images.
6. Test the Configuration
Open the tethering software and verify that the camera is detected. Capture a test shot and ensure the image is saved in the tethering folder. In Photo Supreme, open the tethering feature and confirm that Photo Supreme displays the image as expected.
7. Optional Enhancements
Tripod or Mount | To keep the camera stable during tethered shooting. |
|---|---|
External Monitor | For larger real-time previews. |
Power Supply | Use a camera AC adapter or battery grip for long sessions. |
By ensuring these components are in place, you’ll have a seamless tethering configuration ready for use.
Monitoring the Tethering Folder in Photo Supreme
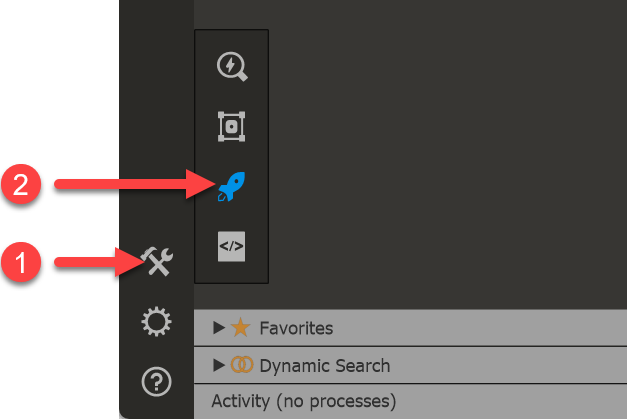
After connecting your camera and ensuring the tethering environment is set up, you’re ready to begin monitoring the tethering folder. To start, open the tethering feature by clicking the Tools button in the left sidebar and selecting the tethering option. Alternatively, use the keyboard shortcut Ctrl+Alt+K on Windows or Cmd+Opt+K on macOS.
The first step in setting up your tethering workflow is to configure the tethering session you’re about to start. Begin by assigning a unique name to the session. This name helps you easily identify and organize your images, especially when working on multiple projects or shoots.
Next, select the tethering folder, which is the designated location where your captured images will be stored. This folder is typically linked to the software provided by your camera manufacturer. Within this folder, you can also specify a sub-folder to further categorize the images, such as by project, date, or subject. This sub-folder structure is particularly useful for keeping your files organized and accessible during and after the shoot.
Taking the time to properly name the session and set up the folder hierarchy ensures a smooth workflow and makes it easier to locate and manage your images later in Photo Supreme. Once everything is configured, you’re ready to start capturing and reviewing your photos in real-time.
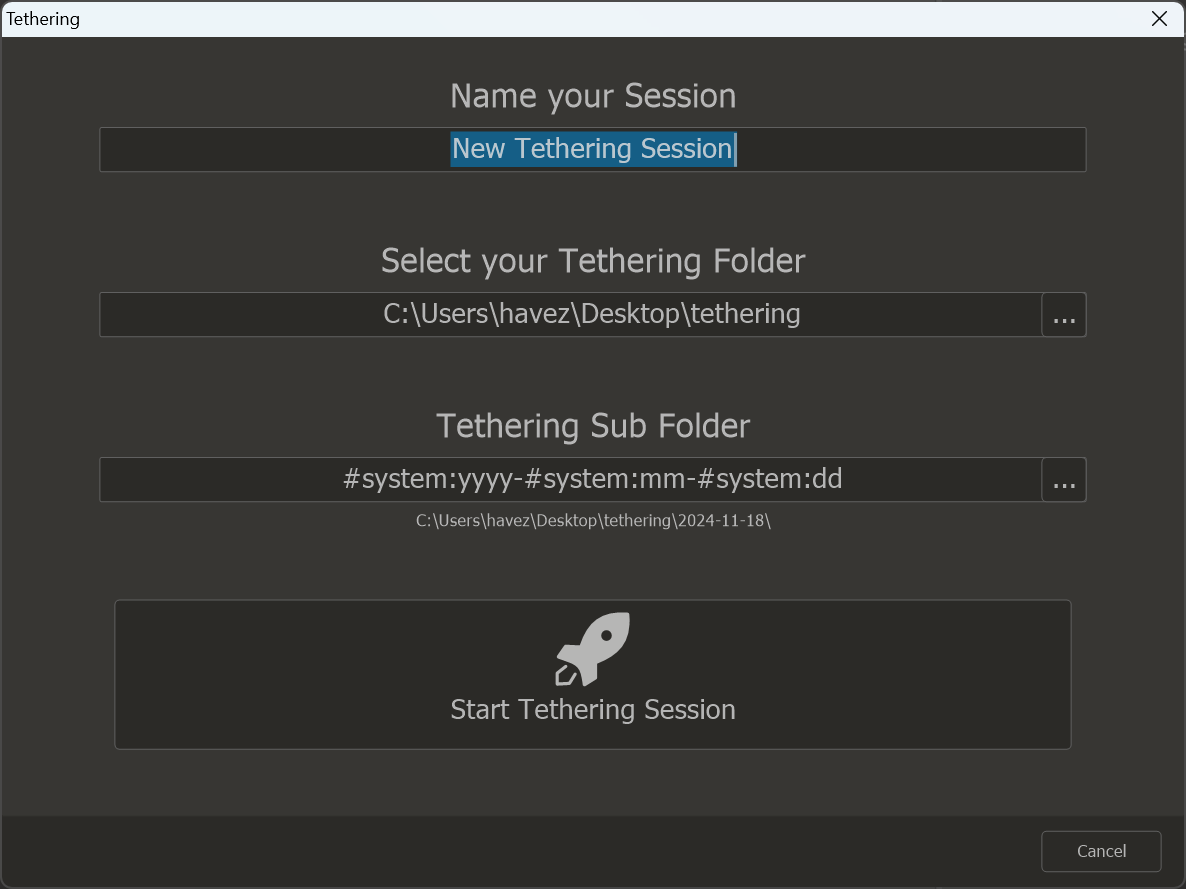
Name your Session | Enter a name for your tethering session. This can be anything meaningful to you, such as a client’s name, a project title, or any label that helps you identify the session later. Choose a name that aligns with your organizational system for easy reference. |
|---|---|
Select your Tethering Folder | Your camera manufacturer’s tethering software (e.g., Canon EOS Utility, Nikon Camera Control Pro, Sony Imaging Edge) typically allows you to configure a folder where captured images will be stored. In most cases, the software provides options to define a folder and even organize files into subfolders based on specific parameters, such as the shoot date or project name. In Photo Supreme, select the same folder that you configured in your manufacturer’s software as the tethering folder. This ensures seamless integration and allows Photo Supreme to monitor the folder for new images as they are captured. |
Tethering Sub Folder | If your manufacturer’s software is set up to use a parameterized subfolder structure, such as automatically creating subfolders based on the current date, you can replicate that setup here in Photo Supreme. For example, using a date-based subfolder is a common practice that helps keep your files neatly organized within the main tethering folder. Ensure the subfolder configuration in Photo Supreme matches the one in the manufacturer’s software for consistency. |
After configuring the session settings, click the “Start Tethering Session” button to launch the live preview and review window. This window will display images in real-time as they are captured, allowing you to monitor and review your photos immediately during the shoot.
Live Preview and Review Workflow
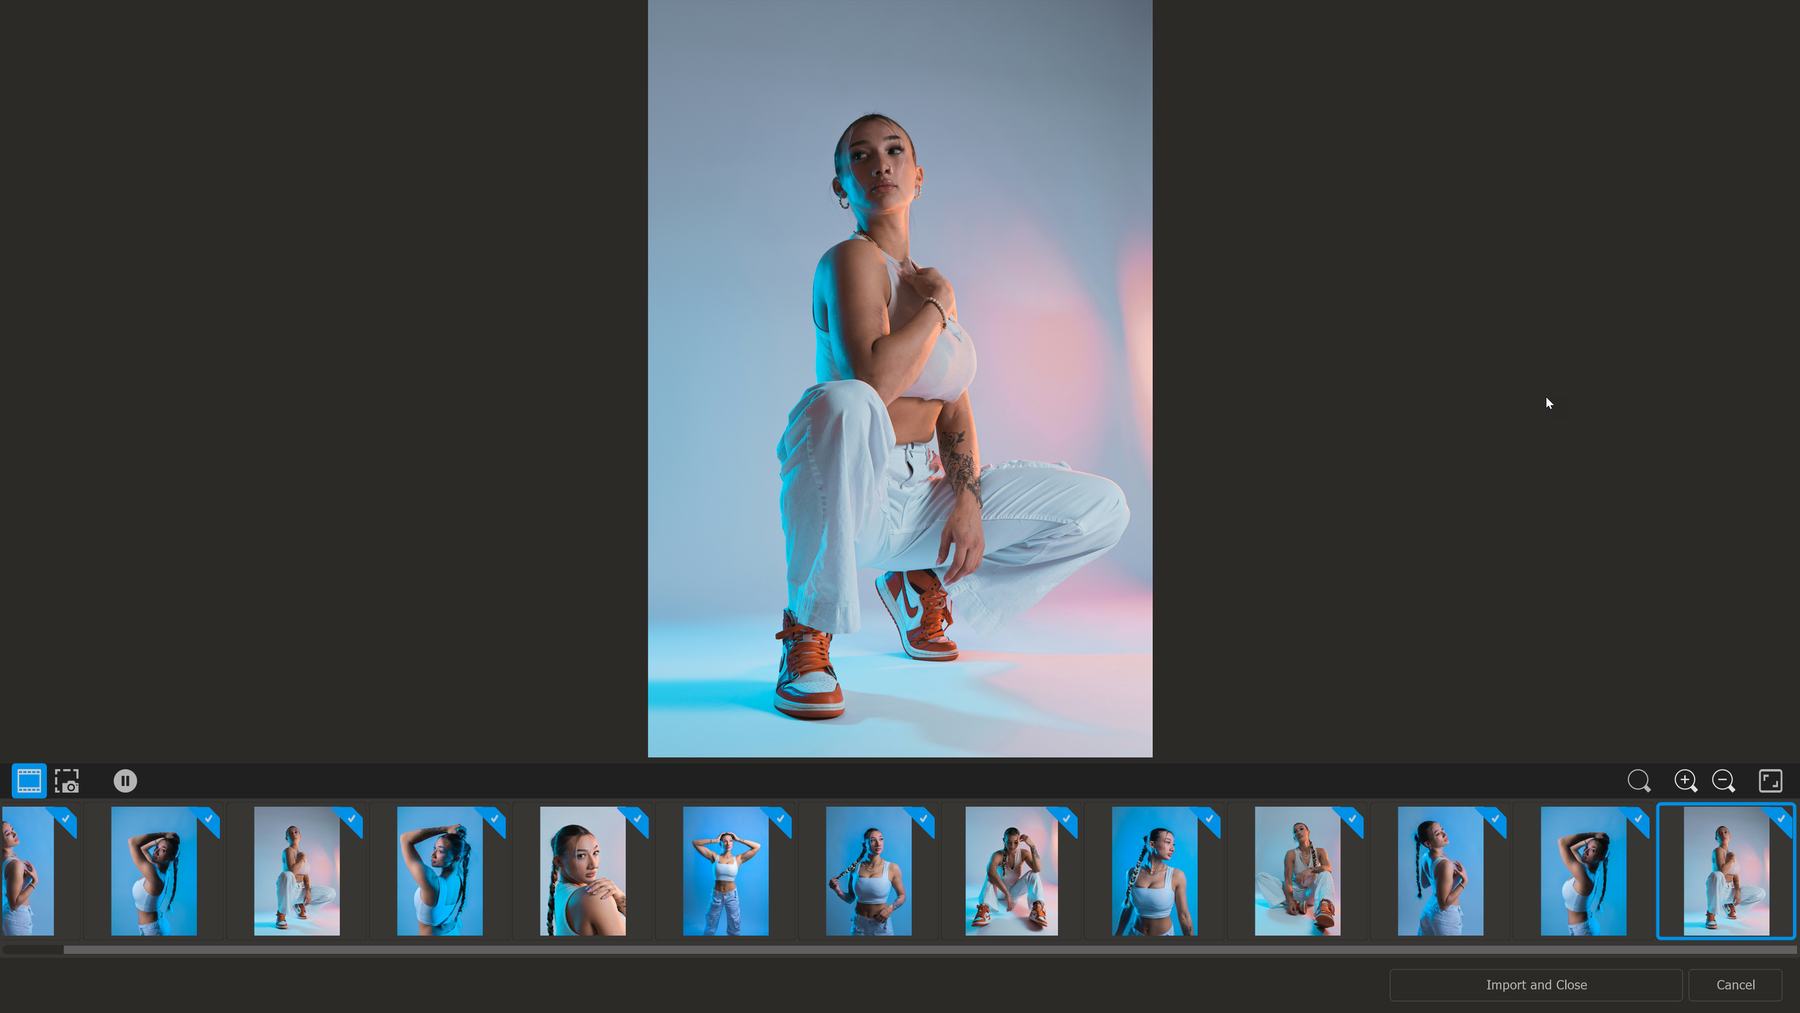
The top section displays the live image, while the bottom filmstrip showcases thumbnails of all images captured and stored in the tethering folder. Upon launch, any pre-existing images in the folder are automatically loaded, allowing you to seamlessly continue the day's shoot.
When you start a tethering session, the Live Preview window opens. If no images have been captured yet, a notification appears, indicating that Photo Supreme is waiting for tethering files in the specified folder.
