Photo Supreme Quick Start
The Application
Upon launching the application for the first time, you'll be greeted by the main screen, which is divided into three distinct areas:
- Catalog Tree (Left Side): This section is dedicated to managing and organizing your files within the catalog.
- Collection Viewer (Middle Section): This area displays the thumbnails of your images. You can sort these thumbnails using various options by clicking the Sort button located below them.
- Flexible Panel (Right Side): This panel can be customized to display different functionalities. Depending on your needs, you can choose to show Info, Batch, Light Table, Details, AI, GEO Tag, or Assign by using the command buttons situated below the Collection Viewer.
The Tips System
Included within Photo Supreme's documentation is the Tips System, which serves as a primary resource for obtaining basic assistance regarding screen controls and widgets. You can activate the Tips System by selecting it from the Help menu.
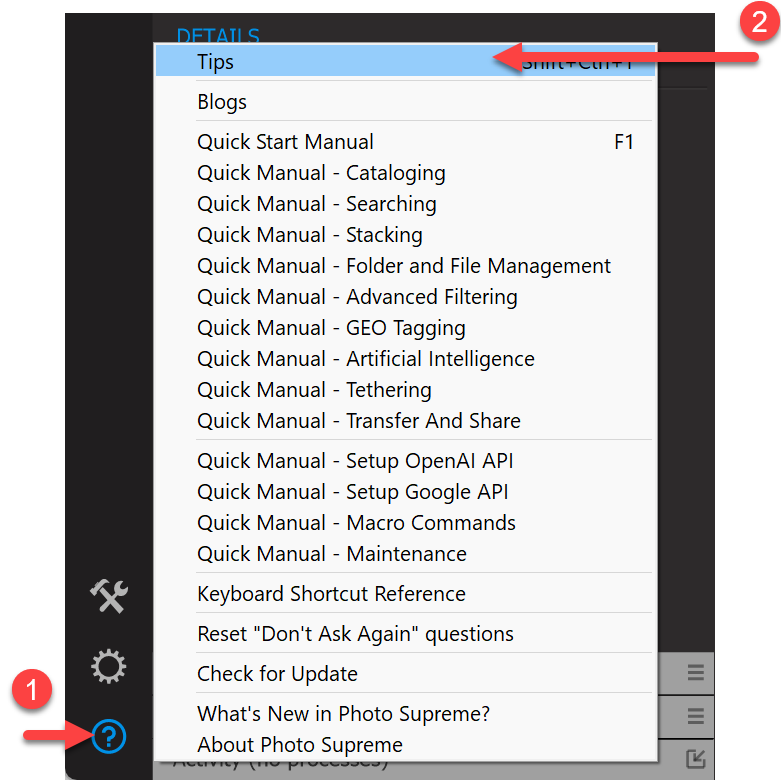
When the Tips System is activated, you can hover your mouse over the screen widgets to display a tooltip that explains what each widget is and how it can be used.
Supported file formats
After installation, Photo Supreme supports the following image, video, audio, and document file formats.
| Extension | Format |
|---|---|
| 360 | Supported non-image format (*.360) |
| 3FR | Hasselblad 3FR |
| 3GP | Supported non-image format (*.3GP) |
| AF | Supported non-image format (*.AF) |
| AFPHOTO | Supported non-image format (*.AFPHOTO) |
| AI | Supported non-image format (*.AI) |
| ARW | Sony Alpha RAW file |
| AVI | Supported non-image format (*.AVI) |
| AVIF | Supported non-image format (*.AVIF) |
| BMP | Windows Bitmap Format |
| CR2 | Canon RAWv2 Format |
| CR3 | Canon RAWv3 Format |
| CRM | Canon RAW Movie Format |
| CRW | Canon RAW Format |
| DCR | Kodak Camera RAW Format |
| DIB | Windows DIB Bitmap Format |
| DNG | Adobe Digital Negative |
| DOC | Supported non-image format (*.DOC) |
| DOCX | Supported non-image format (*.DOCX) |
| EPS | Supported non-image format (*.EPS) |
| ERF | Epson RAW Format |
| FAX | GFI Fax Format |
| FFF | Hasselblad 3F |
| FLAC | Free Lossless Audio Codec File Format |
| FLV | Supported non-image format (*.FLV) |
| GIF | Graphics Interchange Format |
| GPR | GoPro RAW File |
| HDR | High Definition (HDR) |
| HEIC | High Efficiency Image File Format |
| HEIF | High Efficiency Image File Format |
| HIF | High Efficiency Image File Format |
| IDIPIXELS | IDimager Pixel Format |
| IIQ | Phase One Intelligent Image Quality RAW file |
| INSP | Insta360 Camera Photo Format |
| INSV | Supported non-image format (*.INSV) |
| JFIF | Joint Photographic Experts Group |
| JPE | Joint Photographic Experts Group |
| JPEG | Joint Photographic Experts Group |
| JPG | Joint Photographic Experts Group |
| JXL | JPEG XL Picture Format |
| KDC | Kodak Digital RAW Format |
| M2T | Supported non-image format (*.M2T) |
| M2TS | Supported non-image format (*.M2TS) |
| M4V | Supported non-image format (*.M4V) |
| MKV | Supported non-image format (*.MKV) |
| MOS | Leaf RAW Format |
| MOV | Supported non-image format (*.MOV) |
| MP4 | Supported non-image format (*.MP4) |
| MPE | Supported non-image format (*.MPE) |
| MPEG | Supported non-image format (*.MPEG) |
| MPG | Supported non-image format (*.MPG) |
| MRW | Minolta RAW Format |
| MTS | Supported non-image format (*.MTS) |
| NEF | Nikon RAW Format |
| NEFX | Nikon Pixel-Shift Composite Format |
| NRW | Nikon RAW Format v2 |
| ORD | Olympus RAW Data |
| ORF | Olympus RAW Format |
| ORI | Olympus RAW Image |
| PBM | Portable Bit Map Format |
| PDD | Adobe PhotoDeluxe Format |
| Portable Document Format | |
| PEF | Pentax RAW Format |
| PGM | Portable Gray Map Format |
| PNG | Portable Network Graphic Format |
| PPM | Portable Pixel Map Format |
| PPT | Supported non-image format (*.PPT) |
| PPTX | Supported non-image format (*.PPTX) |
| PSB | Adobe Photoshop Large Document Format |
| PSD | Adobe Photoshop Document Format |
| PSP | PaintShop Pro Format |
| PSPIMAGE | PaintShop Pro Image Format |
| PXD | Supported non-image format (*.PXD) |
| RAF | Fujifilm RAW Format |
| RAW | RAW Format |
| RLE | Windows Run Length Encoded Bitmap Format |
| RTF | Supported non-image format (*.RTF) |
| RW2 | Panasonic RAWv2 Format |
| RWL | Leica RAW Format |
| SR2 | Sony RAWv2 Format |
| SRF | Sony RAW Format |
| SRW | Samsung RAW Format |
| SWF | Supported non-image format (*.SWF) |
| THM | Thumbnail File (JPEG) |
| TIF | Tagged Image File |
| TIFF | Tagged Image File Format |
| TXT | Text Format |
| WEBM | Supported non-image format (*.WEBM) |
| WEBP | Web Picture Format |
| WMV | Supported non-image format (*.WMV) |
| X3F | Sigma RAW Format |
| XLS | Supported non-image format (*.XLS) |
| XLSX | Supported non-image format (*.XLSX) |
If you need support for a file format that isn't already included, you can manually add it. Simply go to Preferences > File Handling > Other File Formats and add the file extension you need. Once added, Photo Supreme will be able to fully manage that format. For these file types, Photo Supreme depends on the operating system to generate the thumbnail and preview. As a result, if thumbnails are visible in Windows Explorer or macOS Finder, they should also appear in Photo Supreme.
Your initial import into the Catalog
Let’s start by importing our first set of images into the Catalog. This process, known as "importing" or sometimes "ingesting", allows you to bring images into Photo Supreme. During the import, you can either import existing files from your disk or copy files from a source folder to a target folder before importing them. Photo Supreme operates using a "referenced catalog", which means the files remain on disk while the catalog stores references (file links) to them.
For this guide, we will import a set of images that are already stored on a local disk. This means the imported images will remain in their original folders on disk.
Tip: To familiarize yourself with the software, it’s advisable to use a copied set of images. Create a test folder and copy a few hundred images into it. Once you feel comfortable with the software, you can begin importing your actual image collection.
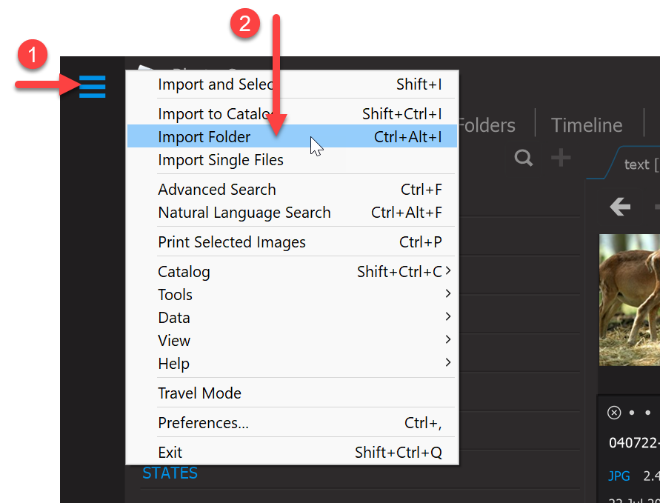
To import your test set, open the Hamburger menu and select “Import Folder”.
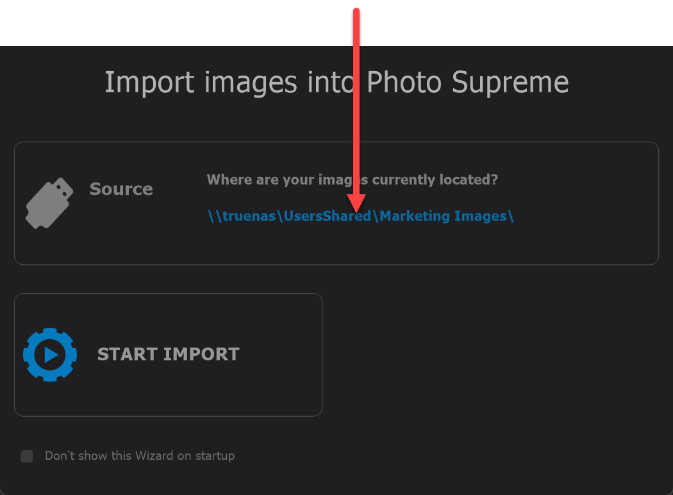
To quickly import images, follow these steps:
A. Select a source: Click the first button and choose the source folder, which will be the test folder you just created.
B. Start the import process: Initiate the import.
The import process will now begin, creating references in the catalog. At this stage, the existing descriptive data (metadata) of the images will be imported, and any existing keywords will be converted into Catalog Labels.
The Import feature in Photo Supreme is highly versatile. For a more comprehensive overview of how to utilize the advanced Import features, refer to the specific Quick Manual about Cataloging. You can access these Quick Manuals by clicking the ? icon in the left sidebar.
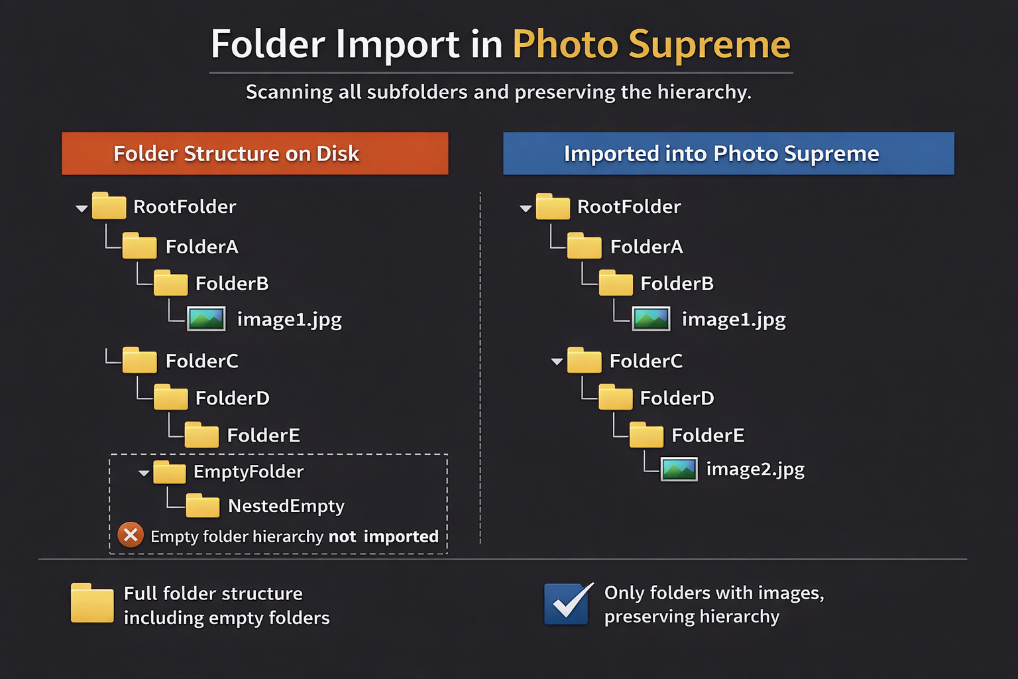
After importing, the folder hierarchy from the disk is replicated in Photo Supreme, and the images are displayed as thumbnails. Note that any subfolders within the selected folder that contain no recognized image files will not appear in Photo Supreme.