Folder and File Management with Photo Supreme
Folder Management
Having read the previous section, you now understand that all images you work with in Photo Supreme are represented as database entries. You can navigate the catalog's contents in various ways, including by Ratings, Color Labels, File Types, Catalog State, Catalog Label Assignments, and Folders. The last option allows you to browse through the folders in the catalog, similar to how you would use your preferred file system browser, such as Windows Explorer or macOS Finder.
To access the Folders section, simply click on the Folders entry in the Catalog Bar.
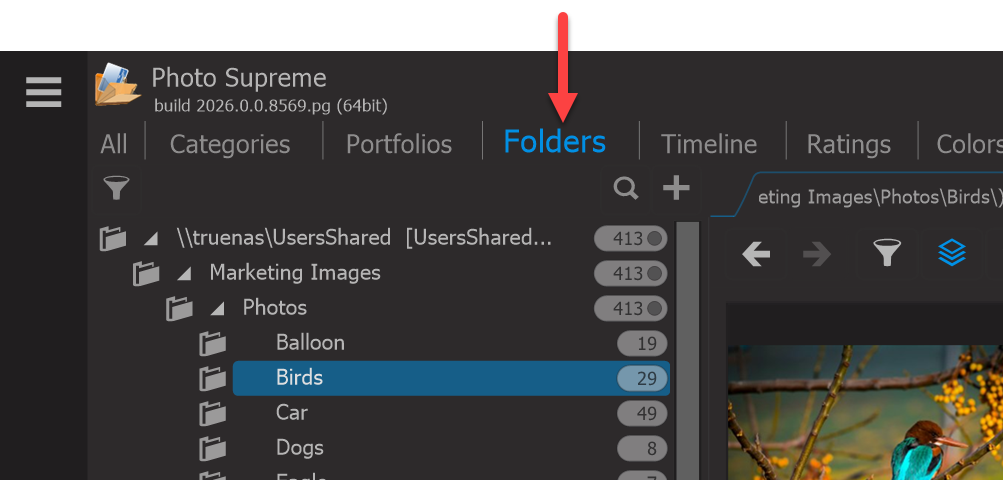
This changes the Catalog Explorer to show the folder hierarchy as it exists within the catalog. In this example, the images are stored on a Windows network share and organized by year. Photo Supreme is compatible with both macOS (POSIX) and Windows file systems. When using the Photo Supreme Server Edition, you can utilize macOS and Windows file systems within the same catalog. However, keep in mind that you cannot access physical macOS files from a Windows system and vice versa.
Folder icons may appear in gray or red. A red-colored folder can indicate one of two issues:
- The folder does not exist on the file system. As discussed in the previous chapter, Photo Supreme displays the contents of the database rather than the file system. If you delete a folder outside of the application, Photo Supreme remains unaware of this and marks the folder as "non-existing" by coloring it red. If you believe the folder should be removed from the catalog, select it and choose “right-click -> Remove.”
- The folder resides on a medium that is currently unavailable. One of the significant advantages of using Photo Catalog Software is its independence from the file system. You can manage files stored on external hard drives, USB sticks, swappable media (CD/DVD), or any other removable devices. If images are managed from such a device and it is not currently connected, the folder will display with a red icon. Once the device is connected (or a DVD is loaded), the red icon will change back to gray.
Setting a Top-Level Folder
In the screenshot above, the network share serves as the root representation for all image folders. However, if you store all your photos in a dedicated folder that isn’t located at the drive's root level (such as the designated Pictures folder in your operating system), the list will always start from the root level. This means you would need to expand each parent level to reach your image folder.
This is where defining a “custom top-level folder” becomes useful. By designating a top-level folder, you instruct Photo Supreme to treat that folder as the root for the FOLDERS explorer. Any levels above the custom top-level folder or at the same level (sibling folders) will be hidden until you decide to remove the custom top-level folder.
To set a top-level folder, right-click on the folder you wish to designate as the root and select “Make this the Top-Level Folder”.
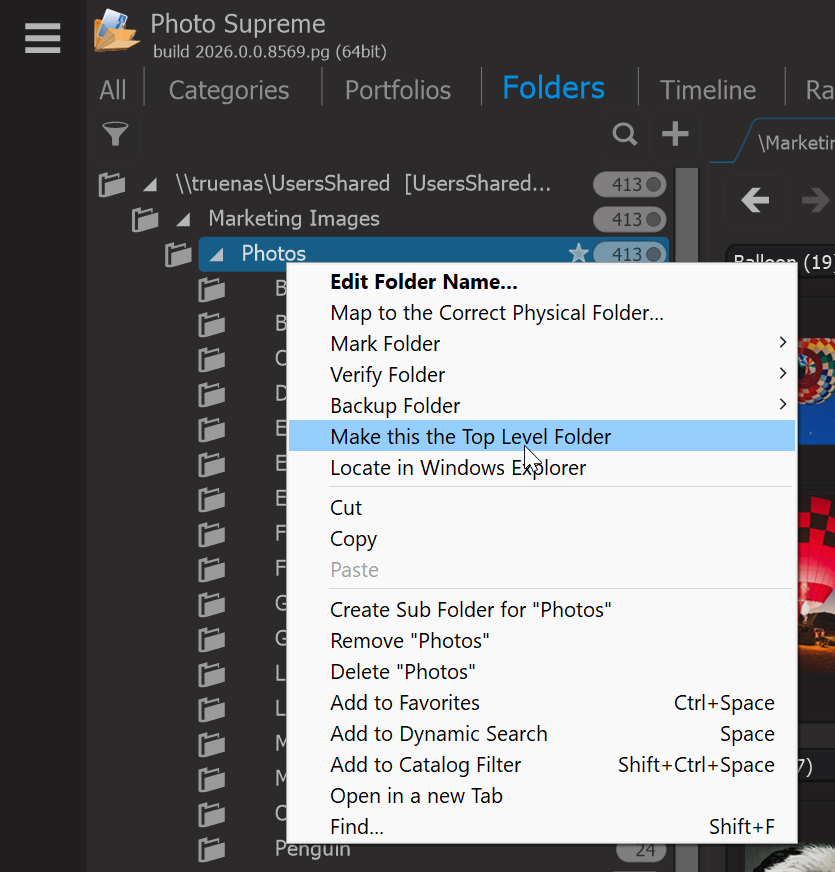
Now you get instant access to the new root folder which saves 3 clicks to drill down to the Photos folder.
You can set a separate top-level folder for every drive.