
Cataloging with Photo Supreme
Import to the Catalog
The process of adding images to your catalog is referred to as "importing" or "ingesting". During the import, you can either bring in existing images from a disk or copy files from a source folder to a target folder before importing them. You always retain control over where your images are stored on the file system, as the catalog contains references to the files on disk.
There are two types of import operations:
- Import files that are already in their designated folder (the files are already located in the correct folder on disk).
- Import files that are copied to their designated folder (the files need to be moved to the correct folder on disk before being imported).
In the most basic import scenario, the process will result in the following:
- The folder is defined in the catalog.
- The folder details are recorded (including the disk name and unique serial number).
- The file is registered in the catalog.
- The attributes of the file are read and stored.
- Optionally, any pre-existing descriptive metadata (such as IPTC/XMP) is imported into the catalog.
- Optionally, existing keywords are converted into catalog labels.
Import files that are already in their designated folder
In this scenario, you have files that are already located in their final folders on disk. This could be your existing image archive, which is organized into folders. By importing these files into the Catalog, their physical locations remain unchanged; no files are copied, moved, or deleted.
When you first perform an import, it’s advisable to start with a small subset of images rather than attempting to import all your image files at once. Take some time to familiarize yourself with the importing process and understand what the results will be in the catalog. To do this, create a test folder and copy a representative selection of images into it. For testing purposes, it’s recommended to copy a few hundred images.
To import your test set, open the upper left Hamburger Menu and select the “Import Folder” option.
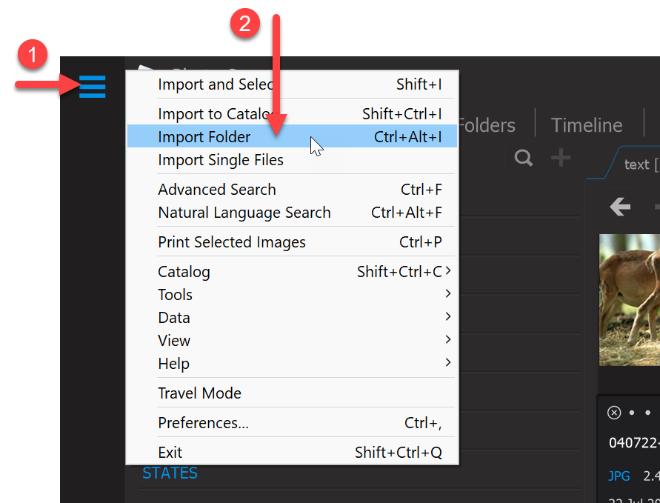
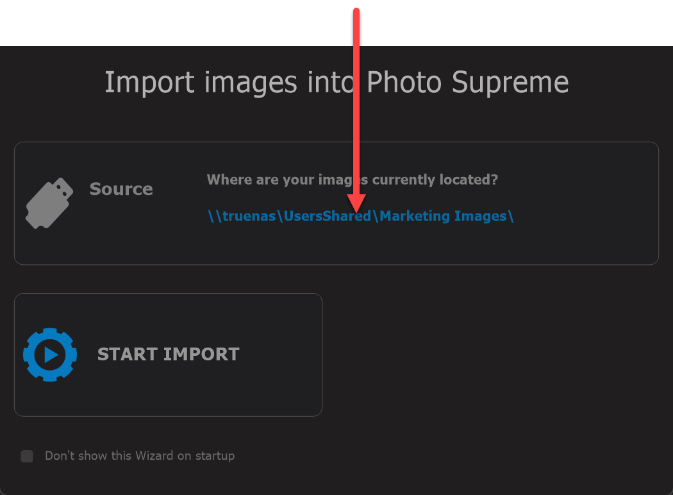
To quickly import images, follow these steps:
A. Select a source: Click the first button and choose the source folder, which will be the test folder you just created.
B. Start the import process: Initiate the import.
The import process will now begin, and your images will be defined in the catalog. The existing attributes (metadata) of the images will also be imported, and any existing keywords will be converted into Catalog Labels.
Import new files
In this scenario, you’ve obtained new image files, either through direct capture or from another source, and they need to be copied to their final location on the file system and added to the catalog. You have complete control over how these images are imported and organized within the catalog.
Import and Select
The “Import and Select” feature lets you choose the best images from a newly acquired set and import only those selected files. This process is often called culling before import, meaning you decide which photos to keep before adding them to the catalog.
Photo Supreme supports a step-by-step selection process. You can start with a first pass to quickly review all images and keep the promising ones. Then, you can make additional passes to further narrow down your choices from the previously selected images. How many passes you use is entirely up to you: small sets may need only one pass, while larger sets often benefit from several rounds of review.
The “Import and Select” feature lets you choose photos to import from different sources. You can select images directly from a connected device, such as a camera plugged in with a USB cable, or from a folder on your computer, for example photos on an SD card inserted into a card reader.
Some photographers prefer to first copy their new photos to a temporary folder on their computer and then import them from there. The “Import and Select” feature supports all these workflows.
To begin a new Import and Select session, click the hamburger menu icon (the three horizontal lines) in the upper-left corner and choose “Import and Select”.
You can then optionally enter a name for the event related to the photos you’re about to import. For example, if the images are from the wedding of John and Jane, you might name the event “Wedding John and Jane Doe.”
Next, choose where your photos are coming from. This can be a directly connected device (such as a camera), a folder on a memory card reader, or a temporary folder on your computer. Click the […] button to browse and select the location that contains your images.
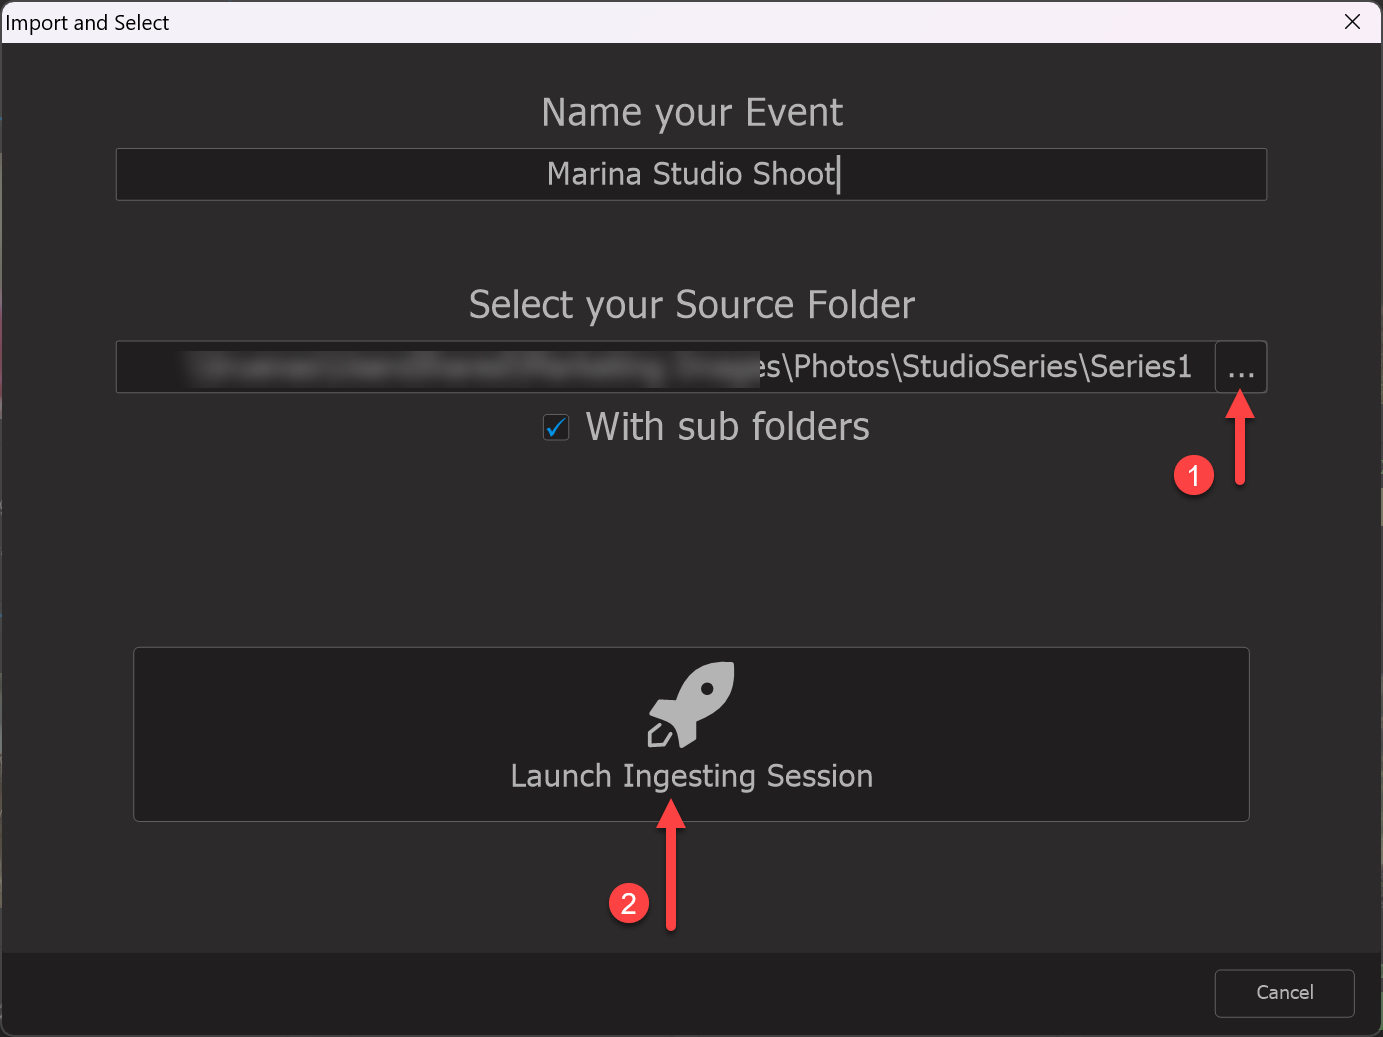
Finally, click the Launch Ingesting Session button to begin reviewing and selecting your photos.
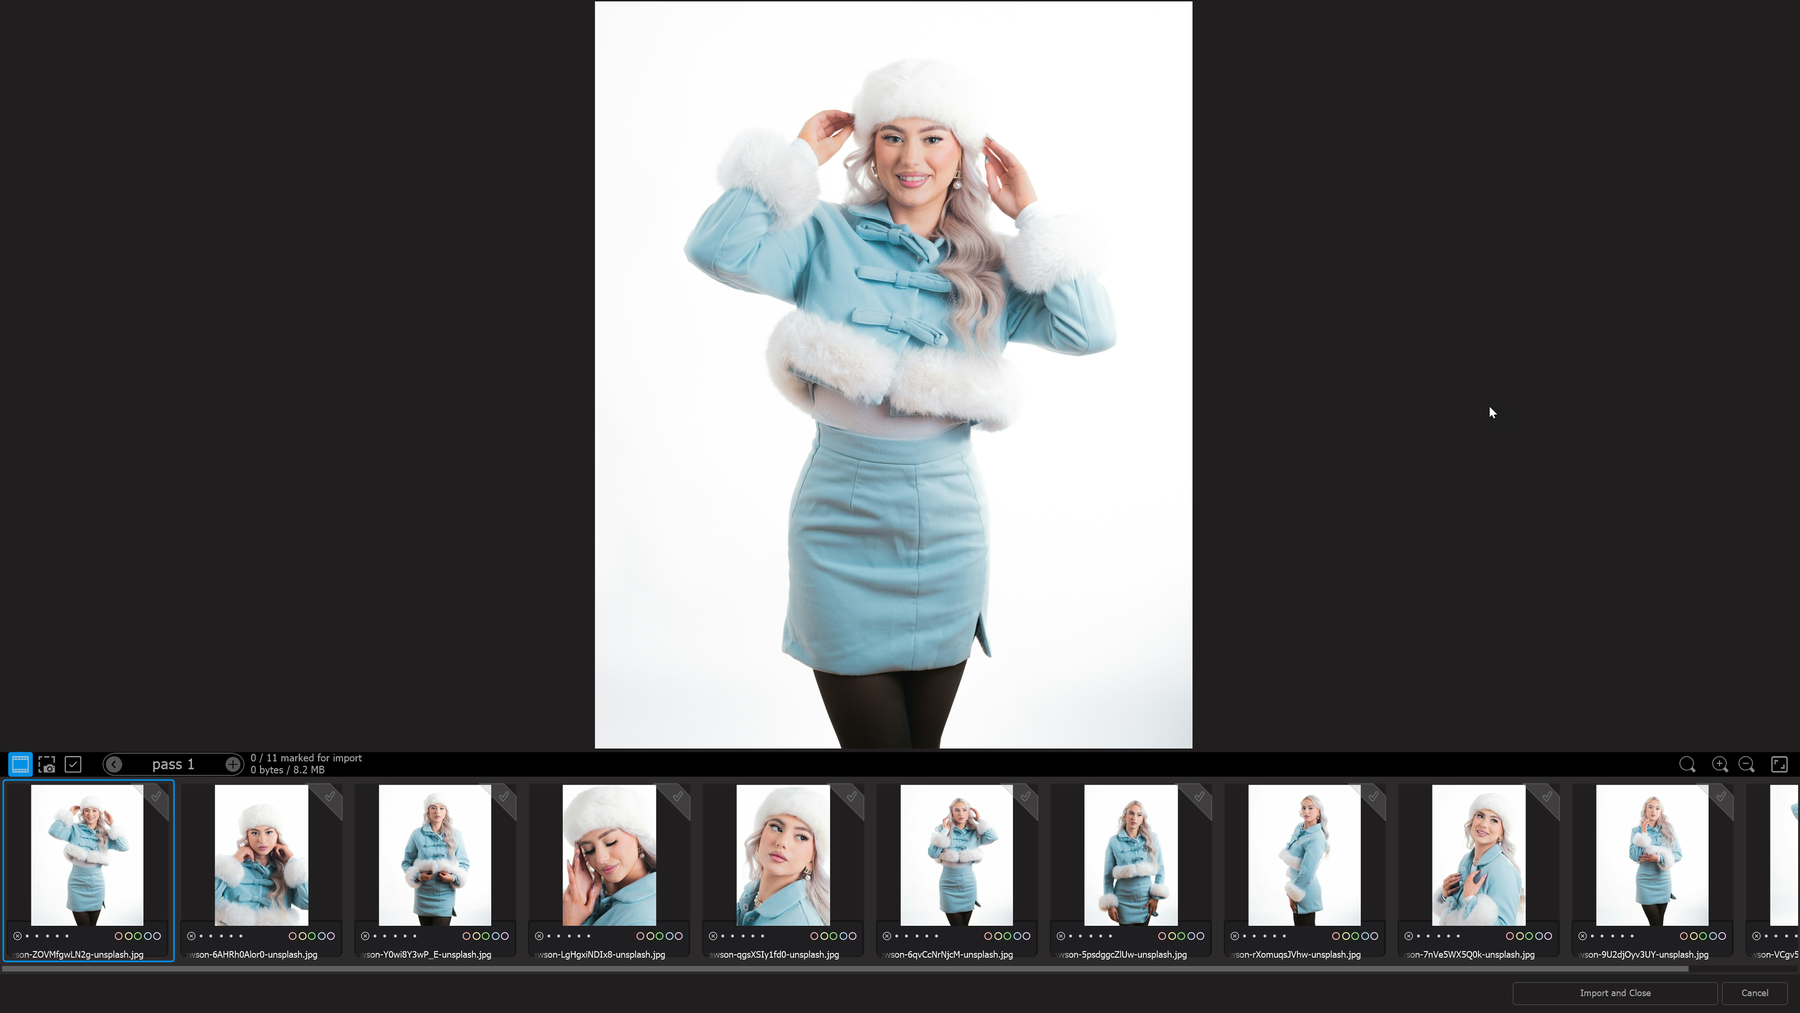
At the bottom of the screen, you’ll see a row of small preview images from your source. This row is called the filmstrip. The currently selected photo is marked with a colored outline. A larger version of this selected photo appears at the top of the screen in the Viewer. When you click on a different thumbnail, the Viewer updates to show that image.
Above the thumbnails is a command bar with several controls. The first button is the filmstrip button. Clicking it opens a menu where you can change the size of the thumbnails (small, medium, or large). You can also turn the filmstrip on or off. Hiding the filmstrip can be useful when you want to use the full screen to view a photo more clearly (note that a keyboard shortcut is available for this as well).
The second button is the Camera Display button. This lets you show or hide the Camera Display Panel. This panel displays technical information about the selected image and includes a brightness (luminosity) histogram, which can help you evaluate the image’s exposure and colors.
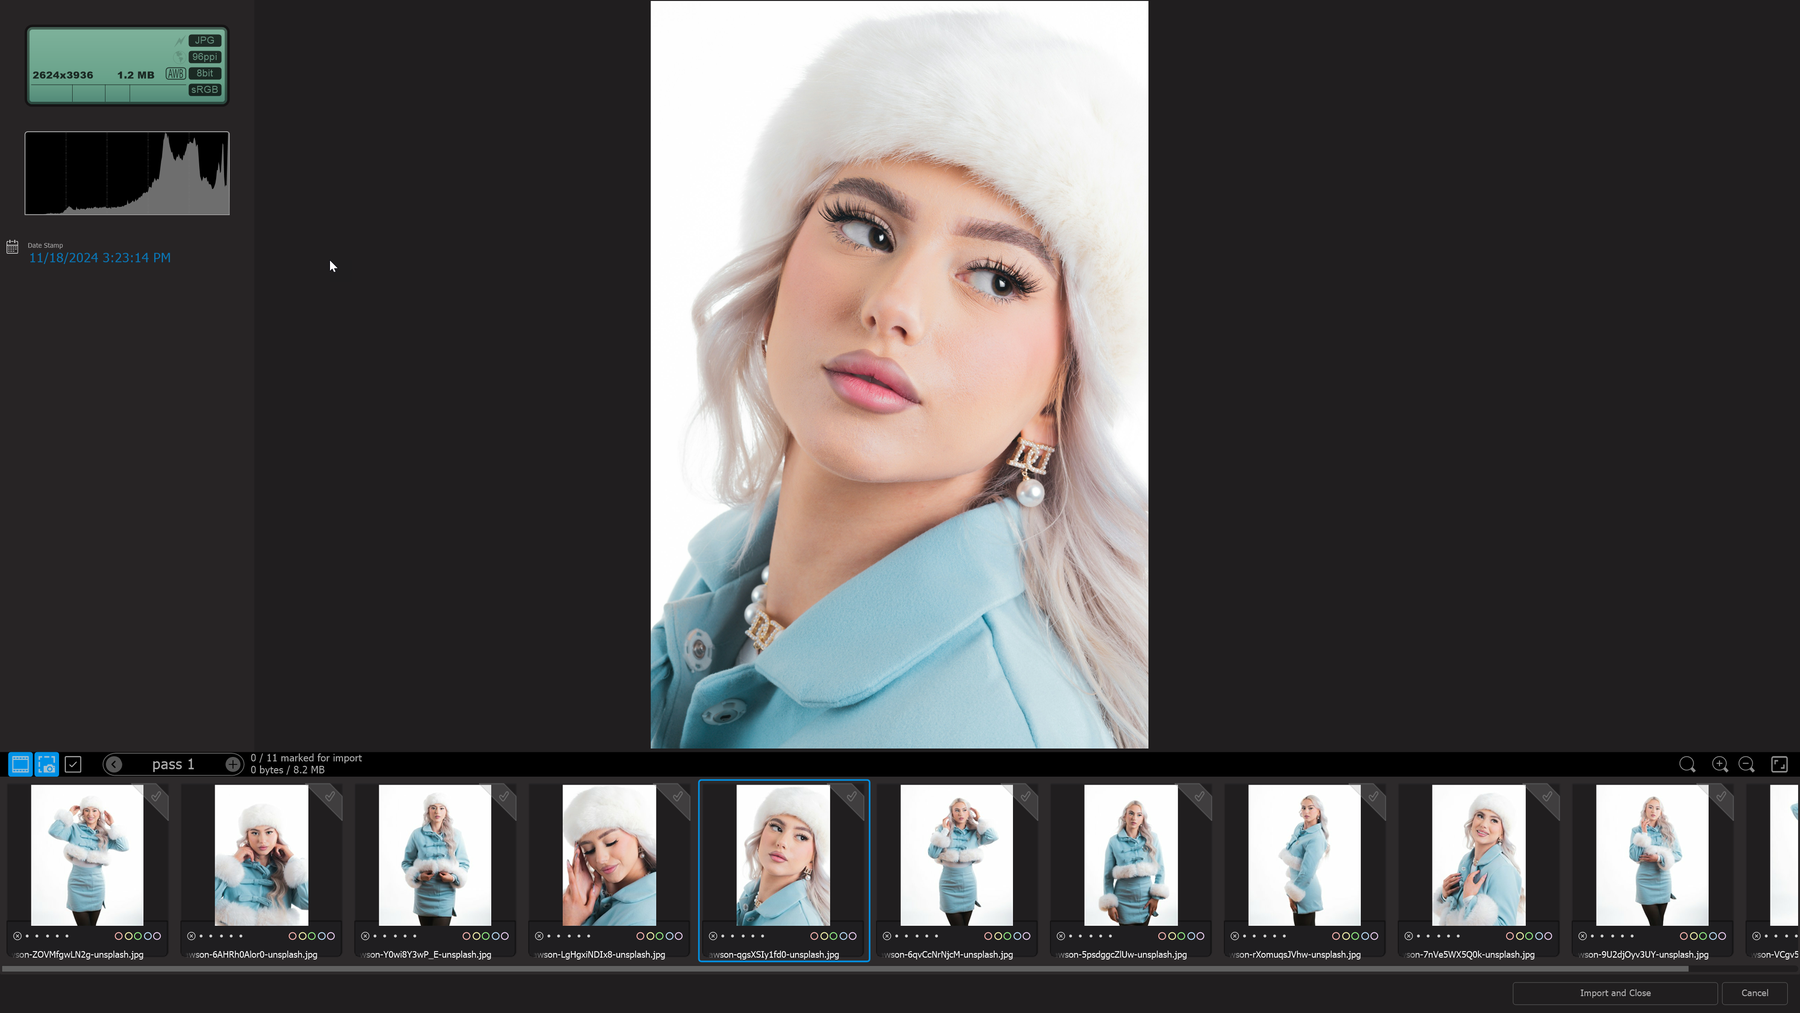
Next is the Marking button. This is used to choose which image files will be imported. Images that are marked will be imported, while unmarked images will be skipped. You can mark images one by one as you move through the set by pressing the spacebar or by clicking the marker ribbon on each thumbnail. The Marking button also lets you mark multiple photos at once; for example, all files with a certain file type or all photos taken on a specific date.
Beside the Marking button is the Passes control. This shows which review round (or pass) you are currently working on. By default, you start in Pass 1. Click the + button to begin a new pass, or the – button to go back to a previous pass. Using multiple passes helps you gradually narrow down your selections.
Finally, you’ll see information showing how many images are currently marked for import and the total file size of those selected images.
At the bottom of the screen, below the thumbnails, you’ll find the Import button. Once you’ve finished marking the images you want to keep, click this button to begin importing them.
During the import, the marked images are copied to their final storage location and added to the catalog. The way files are copied and organized during import is controlled by an Import Profile, which is explained later.
Start Marking
The images are now loaded, and you can begin selecting which ones to keep. You can move through the images using the left and right arrow keys on your keyboard. As you switch from one image to another, the Viewer displays a larger version of the currently selected image.
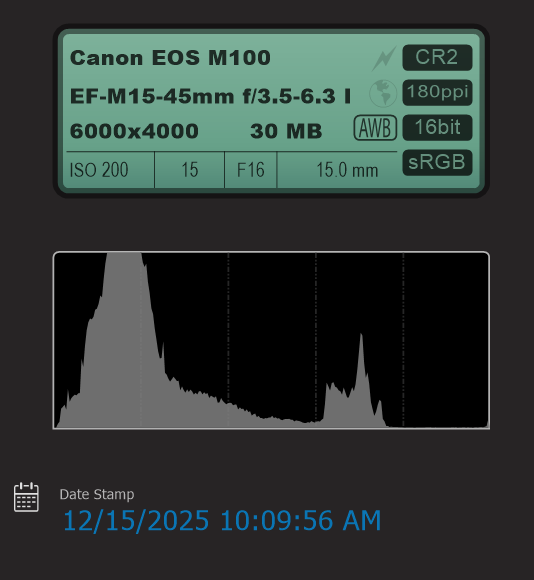
To see more information about an image, press the i key on your keyboard to open the Camera Details Panel. This panel shows helpful details that can assist you in deciding whether an image is a keeper. It includes technical information such as the ISO setting, the lens used, and the aperture (F-number), as well as a histogram that shows how brightness is distributed across the image. The panel also displays the date and time the image was taken and, if available, the GPS location where the image was recorded.
In the Viewer, you can click the left mouse button to see the image at 100% zoom, which helps you check if it’s sharp enough. You can also use the mouse scroll wheel to zoom in and out. The zoom range goes from 1% up to 10,000%.
For quick keyboard shortcuts, press Z to jump to 100% zoom, or press A to automatically fit the image to the Viewer window. You can also use the + and – keys on your keyboard to zoom in or out in small steps.
As you go through your images, press the spacebar to mark an image for import. You can also use the Marking button to mark multiple images at once: for example, all images, none, all images from certain dates, or all images of a specific file type.
Once you’ve finished marking, you have two choices: start a second pass or begin the import. If you want to do a second pass, click the + icon in the Passes control. This will show only the images you marked in the previous pass, allowing you to review and refine your selection. You can repeat this process as many times as needed.
If you want to go back to a previous pass, click the – button in the Passes control. This restores the earlier set of images with your markings intact, so you can easily add or remove marks.
When you’re satisfied with your selection, click the Import button below the filmstrip to start importing the marked images.
Importing
When you click the Import button, the Import dialog appears. Here, you can choose an Import Profile you created earlier. If this is your first time using the feature, you can create your very first Import Profile from this dialog.
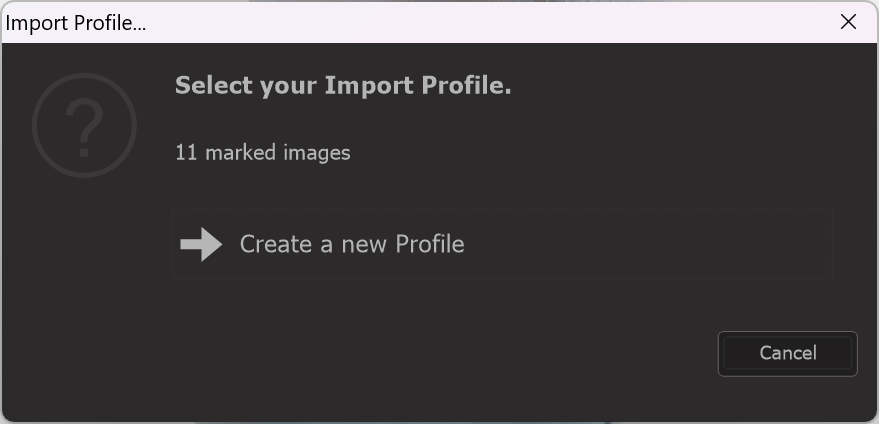
If you choose to create a new profile, the Import Profile editor will open. Usually, you only need to create an Import Profile once and then reuse it for future imports. It’s important to plan a few details before setting up your profile. After all, you want your images stored in the right place, named according to your preferred system, and organized or enriched as needed.
At a minimum, you should decide on:
- Folder structure: How will your image files be organized in folders?
- File naming: How do you want your image files to be named?
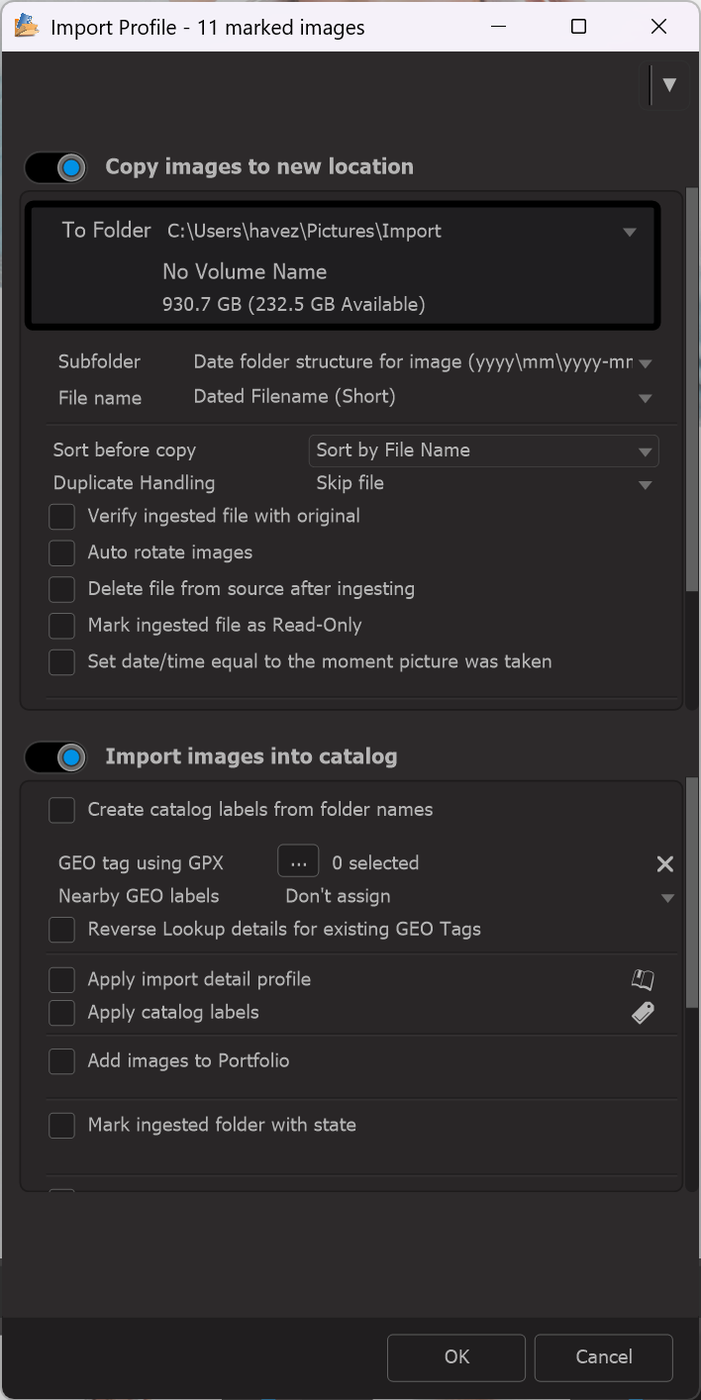
The Import Profile editor has two main sections:
File Copying
Import
In the File Copying section, you can choose the root folder where your images will be saved. In the Subfolder field, you can define how folders should be organized within that root folder. The File Name field lets you decide how your images will be named.
In the Import section, you can optionally add extra information to your images as they are imported into the catalog. For example, you can include your contact details, copyright information, or assign default catalog labels.
Take some time to go through these settings and adjust them to suit your workflow. It’s a good idea to test your profile with a few images first so you can fine-tune the settings before importing a large batch.
Finally, click the OK button to save and then start the import process.
Browsing the Catalog
Once you have imported a set of images into the catalog, you can begin browsing them. Since Photo Supreme is not restricted by the file system, you have multiple options for accessing your images. The Catalog Bar offers several sections to facilitate this browsing experience.

The Catalog Sections are:
All | This provides a central view of the various Catalog Sections all in one place. In the “All” section, you can expand different nodes from multiple sections. |
|---|---|
Categories | Once you begin cataloging, you'll start adding tags (Catalog Labels) to your images, which can be organized into Categories. In this section, you can explore the hierarchical structure of catalog labels and browse through all the images assigned to the various labels. The top level is referred to as "Categories," while all lower levels are called "catalog labels." Categories serve as the primary divisions for your catalog labels, such as People, Objects, or Styles. Each catalog label within a Category can be further subdivided into one or more sub-catalog labels, and those can be divided into additional labels, and so on. TIP: Click the counter icons to view a hierarchical list of a Category or any lower-level Catalog Labels. |
Portfolios | Portfolios provide an organizational structure that allows you to create selections of images known as Collections. Collections consist of a set of images that you want to keep together and can be further divided into sub-collections. These Collections are stored within a Portfolio Album. In real life, you might have several photo books, with each book containing chapters of photos. For example, a photo book documenting a world trip would have a chapter for each country you visited, with each chapter showcasing the photos from that country. In Photo Supreme terminology, the photo book represents a Portfolio Album, while the chapters in that book are the Collections. Each Collection is where you gather your photos. The Portfolios section allows you to access your Portfolio Albums and navigate their hierarchical organization. Organizing images into portfolios enables you to create a structured grouping of images that you want to keep together. While this may sound like catalog labels, the key difference is that portfolios allow you to make selections. For instance, you might have a catalog label called "Holiday 2024," but you could also create a Portfolio Collection for it that only includes your best images from that trip. This way, when a friend visits, you can showcase your "best of" collection. Additionally, you can create portfolios for your online image archives, which typically represent a subset of your complete collection. Some examples include a portfolio for your website images or a portfolio for your client projects organized by year. TIP: click the counter icons to get a hierarchical result of a Portfolio or lower-level collection |
Folders | As images are added to your catalog, Photo Supreme records their physical locations on your storage drives and retains this information in the catalog database. This feature allows you to browse the folder structure of a specific drive, even if that drive is not currently connected to your computer. Accessing the Folders section provides you with the folder structure as it exists in the catalog. By using this section, you can mimic the file system. The folders are displayed hierarchically, allowing you to expand or collapse folder nodes to view subfolders (if they exist). When you select a folder, the images contained within it will be loaded into the Collection Viewer and displayed as thumbnails. TIP: click the counter icons to get a hierarchical result of a Folder or lower-level subfolder |
Timeline | In Photo Supreme’s Timeline, you can explore your image files by the dates they were taken. It’s like a calendar view: you can start from a year, then narrow down to a month, and finally to a specific day. Inside the Timeline, there’s a special section called Calendar Tags. This adds extra ways to group your photos by time, making it easy to rediscover older shots. Here’s what each part does: Shot Today / Last 30 Days / This Week / This Month / This Year Like Today If you expand “Like Today” you can see all images taken on a specific day of the week; for example, all images ever taken on a Monday. Like This Week Like This Month Like This Season What date is used for the Timeline?A frequently asked question is which date Photo Supreme uses to place an image on the Timeline. Photo Supreme determines the date by checking the available metadata in the following order: XMP exif:DateTimeOriginal XMP exif:DateTimeDigitized XMP tiff:DateTime EXIF DateTimeOriginal (0x9003) EXIF DateTimeDigitized (0x9004) EXIF/TIFF DateTime (0x0132) File system Last Modified date
If none of the relevant XMP or EXIF date fields are present, it falls back to the file’s Last Modified timestamp. |
Ratings | In Photo Supreme, every image can be assigned a rating. This rating is a score that you give to each image, which can be 0, 1, 2, 3, 4, 5, or marked as “rejected”. Typically, a “1 star” rating signifies a lower quality image compared to a “5 star” rating, while a “rejected” rating indicates that the image is not worth keeping. In this section, you can browse your catalog according to these ratings. |
Colors | In addition to ratings, you can assign a Color Label to each image. A Color Label serves as a marker that you can use to indicate a specific purpose. For example, you might use a red color label for images you want to delete and a green one for images you want to keep. It’s entirely up to you how you set this up, so try to create a color label system that helps you effectively catalog your images. In this section, you can browse the catalog based on these color label assignments. Here are some examples of color labels you might use: Red: Ready for the trash bin Yellow: Your Pick Green: Customer Pick Blue: Ready to print Purple: Temporary tag Once you decide what each color represents in your workflow, you can define custom captions for each color. To do this, go to the application's Preferences, open the Catalog section, and then select "Color label names." |
Types | Files have specific file extensions, such as JPG, CR3, NEF, or HEIC. These file extensions indicate the format of the file. In this section, you can browse the catalog based on these file types or extensions. |
States | Photo Supreme maintains several states for your images. This section includes entries that display all images that are catalog labeled, bookmarked, rated, GEO tagged, and more. The Catalog States feature provides a quick overview of the organization status of your images in the catalog, making it a valuable time-saver. |
Details | Images contain metadata that includes a wealth of information. This metadata can be technical (such as the focal length used) as well as descriptive (like the appropriate caption for the image). In this section, you can explore the detailed metadata of your images. |